

When you create a custom model-driven app, you can choose a default solution to create a site map for the app. However, the list contains solutions that are based on entity forms only. The forecast options are based on URL custom control forms and do not appear in the solution list. You must manually add these options to the site map. After you add these options, users in your organization can see them on the app’s site map.
Follow these steps to individually configure the site map for forecast grid and forecast configuration:
- Open your custom app on the app designer and go to the site map designer.
- Select a group from the area for which you want to add the forecast options.
Note: Recommending to use the General area for forecast grid and the Administration area for forecast configuration.
3. On the site map designer canvas, select Add > Subarea.
OR
From the Components tab, drag the Subarea tile to an empty box under the Group section in the canvas. You’ll see the empty box when you move the tile to the correct place in the canvas.
4. Select the subarea that you have created and go to the Properties tab.
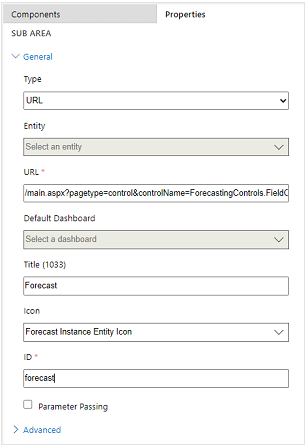
5. Under the General section, do the following:a.
a. Select Type as URL.
b. In URL:
For the forecast grid, enter:/main.aspx?pagetype=control&controlName=ForecastingControls.FieldControls.ForecastGridPage
For the forecast configuration, enter:
/main.aspx?pagetype=control&controlName=ForecastingControls.FieldControls.CCFForecastConfig
c. In Title:
For the forecast grid, enter Forecasts.
For the forecast configurations, enter Forecast configurations.
d. In Icon, select the following:
For the forecast grid, select Forecast Instance Entity icon.
For the forecast configurations, select Forecast Definition Entity icon.
e. (Optional) If required, enter unique IDs for the forecast grid and forecast configuration. You can also use the default IDs.
6. Save and close the site map designer page.
7. Publish your custom app.
The forecast grid and configuration options are now displayed on the site map.
